When it comes to designing a deployment plan for
Windows Vista, it is a good idea to first establish a basic
understanding of its new deployment technologies and tools. If you are
familiar with the deployment processes from previous Microsoft operating
systems, you may be surprised by how many fundamental changes have been
introduced with Windows Vista. Specifically, Vista now employs an
image-based installation and leverages a detailed XML file for
automation of the installation (as opposed to the simple INI file format
used by previous versions).
1. Investigating the Windows Imaging format
Microsoft has
significantly changed the installation process. Previously, numerous
configuration screens were presented during installation, prompting for
which components to install and other information to customize the
installation. Using this information, extensive installation scripts
were run to set up the initial environment. Installation times
frequently ranged from 45 minutes to an hour for a standard
installation. Microsoft has now moved to an image-based setup (IBS).
This new image-based setup is based on Microsoft's new imaging format,
the Windows Imaging format (WIM). Depending upon the computer and the
customizations made to the installation, applying the image may take as
little as 15 minutes.
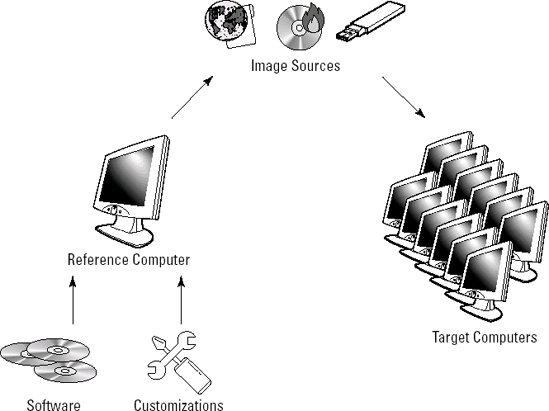
Imaging is the process
of making a copy of an ideal configuration and then replicating that
copy to other computers. As shown in Figure 1,
making an image involves installing an operating system on a reference
computer, adding software and utilities, making customizations, and then
making a copy of the reference computer. This image can then be applied
to other computers to both speed deployment and ensure consistency
throughout an organization.
For quite some time,
Microsoft has been under pressure to better support imaging technology.
Although Microsoft has not offered its own imaging solution until now,
there have been several third-party vendors offering such solutions but
with some inherent problems. In particular, there has been a need to
provide better support of a single image on multiple hardware platforms
and a unified imaging toolset. Providing better support of a single
image allows organizations to support a much smaller number of images,
ideally only one, that lowers support costs and increases consistency
among deployed systems. Providing a unified toolset helps IT departments
standardize imaging tools and reduce costs associated with third-party
imaging tools. With the release of Windows Vista, Microsoft has
attempted to address both of those needs.
One
limitation with imaging Windows has been the Hardware Abstraction Layer
(HAL). Computers that use different HALs have typically required
separate images. An example of computers that require different HALs is a
single processor computer and a multiple processor computer, including
hyper-threading and multi-core architectures. Another example of where
HAL incompatibilities were often encountered was if one computer
supported power management features and the other did not. Windows Vista
now detects and installs the proper HAL, allowing you to use a single
image.
Another factor that has
forced many to use multiple images is supporting multiple mass storage
controllers. Whether using SCSI, Parallel ATA, or Serial ATA, there are a
large number of supported mass storage controllers available and most
use a unique driver. For the most part, that still holds true. However,
updating images to support new mass storage controllers has become much
easier. Previously, extensive and often tedious answer file editing was
required to update an image for new controllers. Now with only a few
commands at the command prompt, your image can support the latest
Windows Vista-capable mass storage controllers.
To address the problem
of a unified imaging toolset, Microsoft has created the new Windows
Imaging (WIM) format and several tools to manage and deploy WIM format
images. The new format is file-based imaging rather than sector-based.
Sector-based images are applied to the hard drive as raw data. The use
of a file-based image format has several advantages.
One such advantage is
that file-based images can be applied non-destructively. Microsoft is
famous for their backwards compatibility and straightforward migration
paths. An important migration path that must be supported for Windows
Vista is an in-place upgrade.
Although sector-based imaging is destructive and destroys all data on
the partition to which it is applied, file-based imaging allows images
to be applied leaving existing files in place.
Another advantage of file-based images is that they leverage the single instance store concept.
Microsoft designed WIM files so that multiple images can be stored in a
single WIM file. For example, a production image and a kiosk image can
both be stored in the same file. Independently, this fact may seem
rather esoteric. However, when combined with the fact that WIM files use
single instance storage, this becomes a rather important advantage. If
you were to compare two of your current desktop images, you would most
likely find that a large majority of the files are the same, most likely
over 90 percent. With single instance storage, only a single copy of
each file is saved. This can drastically reduce image storage space.
Microsoft has internally taken advantage of this technology by shipping
one DVD with five separate editions of Windows Vista. This is possible
because each of the editions shares a common code base, and only files
not found in existing images are added to the WIM file for each
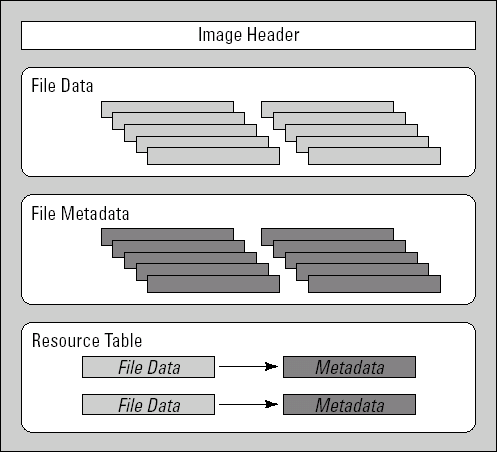
additional image. Figure 2 illustrates the structure of a WIM.
WIM file structure
WIM files begin with a
header. The header of the file contains information, such as the
compression type used and the signature and GUID of the image file.
There are three types of supported compression. The first type, no compression,
stores all files in their original state without attempting any
compression. The image capture and apply operations tend to perform
marginally better with no compression because the CPU is not required to
compress or decompress each file during the process. The second type of
compression is referred to as fast compression and uses XPress compression. Finally, LZX
compression, made famous by WinZip and PKZip, can be used to obtain
high compression. Fast compression is the default method; it provides a
good balance of CPU performance and space savings.
NOTE
When applying images
from a network location or slow optical drive, using no compression can
provide worse performance than fast compression in many situations. This
is true because the performance improvement of pulling a smaller image
across the network often outweighs the extra work that must be performed
by the CPU to decompress the data.
The next section of a WIM
file is the file data portion. In this section, the data from each file
is first compressed and then stored. The other attributes, such as
permissions and directory structure, are not saved here. As a matter of
fact, the filename is not used here. Instead a hash is generated for
each file. When the data hashes of two files are identical, only one
copy of the data is stored, even if the filenames and permissions are
different. This is known as a Single Instance Store (SIS) and is the
largest section of most WIM files by far.
Immediately
following the file data is the file metadata. Each entry in the file
metadata section includes information, such as a filename, an access
control list, and other file system attributes. Each entry maps directly
to a file, except there is no actual data stored here.
All of the magic happens in the next section, the resource table,
which is a table that maps file data to file metadata. The resource
table also includes resource locations that are used to rebuild the
directory structure. If you are familiar with databases, you may
recognize this as a mapping table. If you are not familiar with
databases, you can think of it as a large spreadsheet that connects the
file data to its metadata.
WIM file distribution
After you understand how a
WIM file works, you can address the issue of image application.
Third-party imaging formats require third-party tools to apply those
images to a hard drive. Applying a WIM file can be performed by using
either Microsoft tools or a WIM-compatible third-party utility. A
standard installation of Windows is performed with setup.exe, which replaces winnt.exe and winnt32.exe. Microsoft has also provided another tool, called ImageX, which can both create and apply WIM files.
Keep in mind, however, that
WIM format images are file-based. File-based images do not store any
partition or drive information. This offers the advantage of being very
portable and being able to be used with varying-sized drives, assuming
they can support the expanded data from the WIM file. File-based images
do require, however, that the drive be prepared ahead of time. Disk
partitioning and formatting must be performed before attempting to apply
a WIM file image to a hard drive. This can be performed with any
partitioning and formatting tool, but Microsoft provides the DiskPart
utility to perform disk administration.
Third-party formats
Microsoft has introduced its imaging format as the default distribution
method, but that does not mean you are required to use it other than to
initially install Windows Vista. Many organizations have significant
time and money invested in other distribution solutions, such as
Symantec Ghost and Acronis True Image. These alternative solutions often
provide more than simple imaging features, so it is worth considering
how you use them when deciding if such tools are truly replaced by the
imaging tools now native to Windows. For some, combining Microsoft's
tools with third-party tools may provide an efficient solution.
2. Leveraging Windows PE
Another major
change to the deployment process is the manner in which installations
are started. Before Windows Vista, Windows installation was typically
started from DOS. DOS was used as the startup environment because of its
small size and speed. Using such a small operating system allowed the
installation to be launched from smaller media, such as floppy disks.
DOS was also very familiar to systems administrators and fairly easy to
customize and automate. Microsoft has now moved to a Windows-based
installation environment, Windows PE.
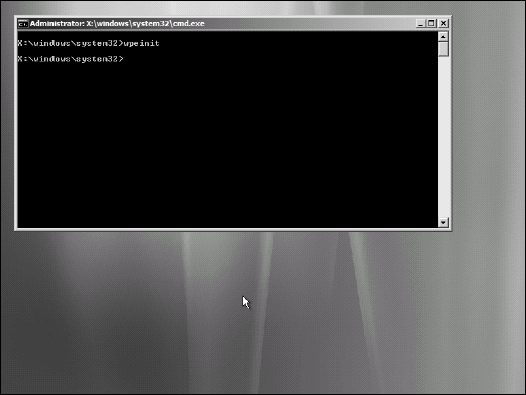
Windows
Preinstallation Environment (PE) 2.0 is a scaled-down version of Windows
Vista which uses a command prompt for the user interface, as shown in Figure 3.
It does, however, have support for some very powerful features that
make it very useful for both deployment and troubleshooting. Some of the
included features are network support, Windows device driver support,
Windows Scripting Host, and many other standard Windows tools and
utilities. Utilities that aren't included can often be added or run from
a network share. Due to the scaled-down features, Windows PE can be
placed on a CD, DVD, or USB flash drive. A basic Windows PE
implementation is less than 200MB in size.
From a more
technical standpoint, Windows PE is a Windows environment running
entirely from memory. Successfully starting Windows PE requires two
parts — boot files and a WIM image — to apply to a RAMDISK, as shown in Figure 4. During boot up, Windows PE boot media looks in a directory named sources for a file named boot.wim. Once found, boot.wim
is imaged into a RAM Disk and given a drive designation of X. The
portion of RAM designated as a RAM Disk is treated as a hard drive and
is unavailable to the system for standard memory operations.
Boot.wim
contains the entire Windows PE operating system. By default, the only
other files present on the boot media are used to boot the system and
image the boot.wim file into RAM
Disk. By putting the operating system in RAM Disk, several things are
accomplished. First, the boot media may be removed after boot because
all necessary files are in RAM. Second, Windows PE requires read-write
access to many of the system files, and RAM Disk is read-writable. This
allows you to use read-only boot media. Using read-only media can be
desirable, especially when dealing with virus outbreaks as the virus
cannot infect read-only media.
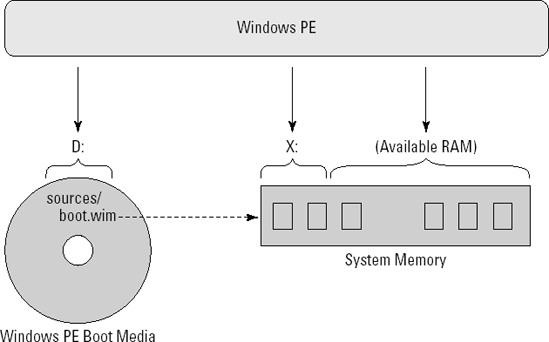
Notice in Figure 1.4
that a hard drive is not required. However, if a hard drive is not
present or partitioned, the boot media will be assigned drive letter C:.
If hard drives are present and partitioned, the boot media will begin
its lettering after all local disk drive letters have been assigned. The
implication is that the boot media drive letter is unpredictable while
the RAM Disk drive assignment is statically set to X:. If you plan to
write custom scripts, keep this in mind.
Obtaining Windows PE
has become much easier with Windows Vista. The distribution media uses
Windows PE to perform Windows Vista installation. Microsoft has also
made Windows PE, along with customization tools, available as a free
download called the Windows Automated Installation Kit (WAIK).
As you begin to plan your
deployment process, one of the first decisions you must make is what
type of images to use.
Although it may be
tempting to base an image on a system already up and running with your
corporate applications, doing so can cause trouble down the road. It is
always advisable to create images based off of a clean operating system
installation in order to attain a more stable and predictable baseline
image. Document what you install and how you install it for accurate
reproducibility.
Default images
Windows installation
times have been drastically reduced since the native installation method
now utilizes an imaging process. For many smaller organizations, this
increased efficiency in the installation process may be sufficient. If
your organization only requires a couple of applications and doesn't
typically re-image more than one or two computers a week, standard
installations may work fine.
When using the
generic installation image from the Windows Vista DVD, you may wish to
automate the few remaining steps of setup. Customizations may include
providing answers to the setup process and/or running post-installation
scripts to install software. A couple of good examples of automated
software installation are antivirus software and Microsoft Office
suites, because it's quite likely that everyone in your organization
will require these applications.
Custom images
Most likely, you will
want to deploy your own customized images. Although Microsoft provides a
generic image, it may require significant post-imaging processing to
modify it to meet your organization's requirements. If you support over
500 workstations, imaging is probably a daily task and saving even a few
minutes each time can be a huge advantage.
The real power of
imaging is that it allows you to create a customized image unique to the
needs of your company, not just what Microsoft thinks you might need.
WIM files were designed with customizations in mind. In addition, free
tools are available so that you can create, apply, and update WIM files.
However, there are three basic types of images from which you must
choose. These distinctions are less technical, and more philosophical.
Before creating any custom images you must decide which philosophy your
organization should follow.
Thin images
The philosophy of using
thin images is one of flexibility. The idea is to create a plain image
with very little, if any, additional software and customizations. All
organizational software and customizations would then be added by
scripts or a management solution, such as System Center Configuration
Manager or Group Policy.
The advantage of a thin
image is that it would require less maintenance because there is less
software included to have to update and maintain. When software updates
are required, the installation sources can simply be updated.
Thin images have also
been used to reduce the number of supported deployment images. Because
there is no software included on the image, a single image can generally
be used to support many different workgroups, for example, Sales,
Marketing, Production, and IT.
Although using a thin
image eases administration, it slows down deployments. After applying
the image, it may take a considerable amount of time for post-setup
scripts to run and complete.
Thick images
Thick images are just the
opposite. They are designed to include every possible piece of
necessary software along with all desired customizations. The goal is
speed and simplicity. After deploying a thick image, there is very
little configuration to perform and no reliance on any external
management software. Typically, naming the computer is all that is
required.
The drawback of thick
images is that the extensive customizations often make an image
practical for only a small group of people. For example, including a
Sales application in a thick image may preclude it from being used for
the Human Resources department. The result is a larger number of
supported images. Another drawback is keeping each application within
each image up to date. The more applications you include in the image,
the more updates and security patches you will have to apply.
Hybrid images
Most often, the ideal
solution falls somewhere between thick and thin. These images are
referred to as hybrid images. The goal is to support a minimum number of
images while providing a relatively efficient deployment process.
A typical hybrid image would include customizations, such as:
Microsoft Office suite
Adobe Acrobat Reader
Preconfigured Internet favorites
Necessary desktop management agents
Drivers for all supported hardware
Specialized or
departmental applications are omitted to keep the image generic enough
to be used throughout the organization. These applications would
normally be installed by using a software distribution solution or
post-imaging script, much like a thin image. However, by including
software packages everyone will need in the image, the post-imaging
processing times should be minimal.
Hybrid images are
not without their problems. Because software packages are included in
the image, it will require updating as each package is updated in your
organization. However, hybrid images do strike a nice balance between
performance and simplicity. This is the recommended image philosophy for
most organizations.
When deciding just how "thick" or "thin" to make your images, ask yourself these questions:
Which applications are common to all workstations?
The more applications that all of your workstations have in common the
more time can be saved by including them in the image. In addition,
lengthy post-image scripts tend to be more error prone.
How long will it take to install each of the common applications?
It may make sense to include only the larger packages, such as Office
suites. Often smaller packages, such as Acrobat Reader, can be installed
quickly and more easily updated if excluded from the image. Keep in
mind that you should only update the image if you update all of the
existing machines in production.
Can the installation of the applications be automated? If an application doesn't lend itself to automatic installation, it's certainly a good candidate to be included in the image.
What type of network connection will be available after imaging?
If you plan to mage your machines with removable media in a remote
location, thick images will require less network bandwidth. Properly
designed, thick images will only require network access to join the
domain, if applicable.
3. Automating the installation of Windows Vista
Building a corporate
image is only the first step in planning your deployment. Although this
image may contain the drivers and applications you want, its
installation still requires the completion of a simple installation
wizard. In previous versions of Windows, you could automate this process
by dictating certain choices in your Sysprep.inf file or the unattend.txt file.
While many administrators would edit this file directly, the key GUI
tool for establishing these installation answer files was Setup Manager (Setupmgr.exe).
The tool did not expose many of the customizations possible when
editing directly, and with no error reporting or validation many
administrators spent many hours fighting simple typos and confusing
entries.
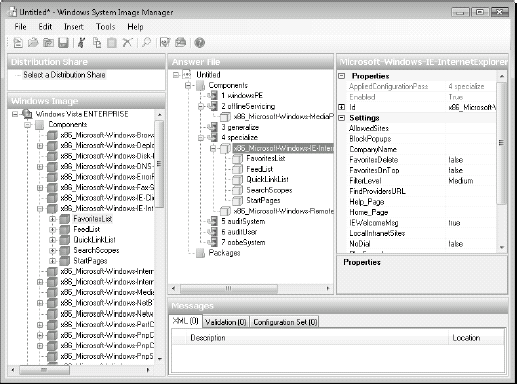
Like the
installation format itself, the capability of automating the
installation of Windows has also been drastically changed for the
better. Today, System Image Manager (SIM) is the tool for not only
creating these tools but also validating them to identify any problems
that may exist prior to use. See Figure 5.
The key thing to understand in the planning phase is the amount of
power such a feature provides you and your deployment. Not only can you
automate the installation options you see during an interactive
installation, but there are also a great number of customizations you
would otherwise never see.
A quick example of some things you can do by customizing an installation with SIM:
Specify the owner and company names as well as the product key for the installation.
Indicate whether to extend the partition to fill the remaining space on the disk.
Customize IE home pages, control pop-up blocker, and dictate default favorites.
Specify if users can use Remote Assistance to request help from a friend or support staff.
Enable or disable the Windows Firewall.
Dictate the name of the primary DNS domain to be searched for the name resolution.
Specify the size and path of the page file.
|
Within SIM, you can
right-click on any value and choose help to be provided with more
details about each setting and value you may specify.
|
|
NOTE
You can use a
freeware tool that goes by the name of vLite, which provides the ability
to remove the things you do not want from the WIM image entirely.